Monday, 24 October 2016

Sorting Horse Tail Hair and Setting on the Kumihimo Disk

Sorting hair for braiding

There are many ways to sort the hair out. Once you have an idea of what you want to make, you can decide how much hair you need and what length. Hair for spiral braids will need to be longer than for flat braids, simply because more braiding and work goes into a spiral braid and more hair is used.

Sorting the hair need not be messy. Provided you get everything around you that you need, it will not take you long to have the hair in place on your disk, ready to be braided.

In this video, you can see how I sort and set the hair and fix the end to keep it secure. This version contains no narration so you don't need sound to watch it.


Sunday, 23 October 2016

Cutting a Sample of Tail Hair

Way back in 2012 I spoke about how to get your sample of hair from the horse. The most important thing about getting a sample is safety. If you are used to handling horses the process of cutting some hair should be straight forward. If you are going to braid some hair for someone else, you can aske them to get the hair for you.

Here is a video I have made with some help from Hope Pastures rescue, rehabilitation and rehoming centre and in particular Henry the horse, showing how to select a sample of hair and cut it, so that it barely shows afterwards.

This is the first of a series of videos that I hope you will find useful.


Sunday, 31 January 2016

Reader Showcase Featuring Mary from The Netherlands


Welcome to the first of a series where the beautiful creations of blog readers is featured!
If you have thought about making a bracelet from horse tail hair but have not yet attempted something, perhaps this series will inspire you to have a go.
 
Read on to learn about Mary's experience of braiding so far.


Hitched Bridle
My name is Mary, from The Netherlands, and I started making horse hair bracelets a couple of months ago, October 2015. I'm working with horse hair almost 15 years though, hitching, making bridles. 


When my 25yr old horse passed away in July 2015 I started thinking that I would love to make a bracelet myself of some tail
hair I have kept from him. But first I needed to practice.


Leather Bracelet with Horse Tail Hair
 
With the help of a friend that does excellent leather work, the first bracelet was with leather (including horse hair that I use for hitching). I was pleased with the result but, I decided that I wanted to make bracelets only from horse hair too. So, I just started...  
The hardest thing was getting findings (end caps, clasps, etc) that I like. There is a lot on Etsy but I was little afraid to order from there and I just wanted to have a few items to start with.

I made two bracelets (again from hair in stock) for myself to try out. I posted them on FB. Then I got questions from friends and people at our stable if I could make one for them with their horse’s hair. Now it was time to get more stuff: other end caps, charms, etc. I've had a lot of help from other enthusiasts that are on the FB page of The Horsehair Bracelet Project. They gave me help and a lot of ideas. I would never have dared to start making a bracelet for someone else without them!
 
Horse Hair Bracelet


There is still a lot of progress to be made, but that will come, in time. I love making the bracelets and make people happy, so I've found a new hobby. Still need to make one for myself from my horse his hair though, but for the next week I'm little too busy with other ones


Readers will all agree that Mary has produced some beautiful items here. Bracelets that hold memories of treasured equine partners. Mary's desire to create her own bracelet was driven by the loss of her horse Jengo. Below is a moving tribute to Jengo with some photos of him in his prime.


I was asked by Louise to also write something about my best friend and biggest love…. my horse Jengo, who passed away on July 2nd, 2015 at the age of 25, after being together for 18 years, 2 months and 4 days…..

It's very difficult to put something on paper in short, as I could write a book about him, and about us….. What we did and the bond we had. Besides that, it's emotionally very hard. I think about him every hour of every day. Thinking about him brings me to tears immediately, as it is now, at this moment again. Some horses are just 'once in a lifetime' friends.

Therefore I decided to translate my farewell letter to him, as it's the best way to let everyone know how much I miss him….

Some explanation:

Boy is my other horse, Julienne is my disabled sister, Kim is my friend and stable-mate, Levi is her horse and Jengo's 'being nuts together' meadow mate.

Mischa is my dog who always went riding with us and loved to sit on the saddle in front of me. She became 17,5 years old
 

Goodbye darling….

After the most fantastic period of 18 years, 2 months and 4 days together, I had to say goodbye to you today. You were 25 years old….

We would have loved to spend so much more time together, with Boy, with Kim and her horse Levi, but it was not meant to be. Julienne is heart-broken and misses you terribly.

You were 'her' horse, the only one she trusted and you have never ever done something wrong when she was riding you, whilst you showed me every corner of the riding arena and the forest, in full speed.

It will never be like it was…. It hurts so, so much…..

You where my teacher, my pride, my rock and the rock of so many other, young horses you took in tow. You were a hard worker, a fighter, a horse with brains and a build-in compass.

You confronted me as no-one else could and outsmarted me so many times. I had to earn your respect instead of the other way around, we were two peas in a pod, knowing each other as no-one else did. One look in each others eye was enough.

A once in a lifetime horse, so extraordinary, so special.

After your serious injury in December 2012, you fought and came back. With all the possibilities we got from the stable owners and with so much help and patience from Kim. You loved training English again with her to get your strength back, enjoyed it to the max. You and me made as many rides outside as possible. Going out together with Kim & Levi, the both of you as nuts as can be. Oh gosh, how much fun we had….we enjoyed it and had so many laughs. How crazier the better and preferably going as fast as you could.

You also enjoyed playing with Boy and riding outside. You took him to tow as from day 1 when Boy came in 2008. The leader and the follower, it was so clear. You gave him confidence as a young horse and led him through life.

By sweetheart… time has come, you are so tired, your leg being not well again.

You always wanted to work so hard, wanted to do all you could for me, wanted to deserve your food otherwise you were not satisfied and felt useless.

You fought and came back from your first injury, but now it's enough, I can see it in your eyes.
 

Please go look for Mischa and give her a big hug. Go run into the forest together, like the three of us did for so many years

Soon we'll be together again, you'll come home…..


Jengo, thank you for everything!!!

I'll never ever forget my little guy!!

Your lady…..


Wednesday, 29 July 2015

12 Strand Rounded Flat Horse Hair Braid


12 Strand Rounded Flat Braid

In my last blog post we looked at an 8 strand braid. I had an idea to adapt this pattern to see how this would affect the design. The result was a more chunky design that can easily be adapted to create various colour patterns.


12 strand rounded flat kumihimo braid
The result is a 12 strand rounded flat bracelet. This design has a sterling silver hoof print attached to enhance the bracelet.

This braid pattern will be posted later this week. Flat braids are quicker to make than the spiral designs. The work is not rotated and it is easier to maintain tension in the horse hair. I really like this particular pattern. 

It is worth stepping outside of your comfort zone once in a while to try different patterns. You never know what you might come up with!

Tuesday, 24 February 2015

8 Strand Rounded Flat Braid

There has been quite a lot of discussion on the Facebook page related to this blog about patterns and how to achieve different effects, especially when making an 8 strand braid.

Having built up quite a library of braiding books, when I come across a pattern which looks as though it might work using horse hair, I try it out.

The photo below shows a rounded flat braid. It is made  on a round disc and the disc is not rotated, resulting in the finished effect.


Above the braid is straightened out. To the right you can see a gentle spiral effect


Pattern Details

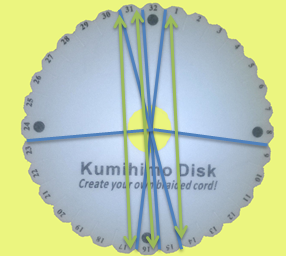
The first diagram shows the start position of the horse hair


Now, starting right to left, move the bottom strand at position 1 to 15 and then move 15 to position 1. Moving north to south and south to north.

Do this with each set of vertical strands until all have changed places.


Lastly, the horizontal strands are moved east to west then west to east. 9 to 24 then 24 to 9

You are now ready to work the moves once  more until you reach the length you want.


Thursday, 8 January 2015

Braiding Shorter Lengths of Horsehair: braided bead necklace (part 2)

Find other pattern posts here

How to Make an Attractive Horsehair Necklace


Blog followers will recall that in 2014, some tail cuttings were found from my old Irish horse that had been stored in a bag for more than twenty years. The tail hair was dry and brittle and needed a lot of care before it could be used for braiding. The hair was also quite short. So many of us find we have short locks of hair as keepsakes from our horses. Apparently too short to turn into anything to wear. But maybe there was a way.....

Here I hope to show you one possibility.

The first part of this particular project can be found here Braiding Shorter Lengths of Horsehair part 1. Part 1 looked at how to make a smaller kumihimo disc so that more of the horsehair is used and not wasted.

NOW, you can see what can be done with shorter braids.

Look out for part 3 of this project coming soon, where braids will be incorporated into a pendant. 

Horsehair Braids, Beads and Wire Work

This necklace design is one I have had in mind for some time, but I wanted to gain more experience of beading, wire work and braiding before trying it out.

First, the braids were prepared. Four in total. Two braids of 3 cm and two of 7 cm. The braids were a 16 warp spiral kumihimo design (5 strands of horsehair per warp).

The ends of the braid were tied off as usual but rather than fix with an end cap or crimp end, wire was used to add interest and give the necklace a more conventional, flowing look. 0.6 mm silver plated wire was used. It was  soft enough to mould but firm enough to hold the piece together. Blog post horsehair bracelet starter tools showed the basic equipment needed to make bracelets and necklaces. No extra tools have been used for this necklace and so if you have the basic tools, you will easily be able to create braids incorporating beads and wire.

The beads came from a bead fair but you can find beautiful beads in the internet, in all sizes and colours.

The length of the necklace is approximately 60 cm. When you design your own piece, have in mind how long you want it to be. You can sketch out your design first and get an idea of how the braids and beads will fit together. Once the braids are complete I set them on my work tray and decide on the final order and size of the beads.

The wired braids are then connected to the wired bead segments. Should you ever want to change the colour arrangement you can simply undo one end of a bead segment and fit your new beads. If you find you cannot undo the wire segment it can be cut and rewired with minimal fuss and won't affect your braid segments.

The necklace is finished off with a short length of chain. You will find chain in your local hobby store or, online. This necklace has no clasp. If you make a shorter necklace you will of course need to attach a clasp to the chain.


I hope you have been inspired to try to make a horsehair necklace of your own. For more ideas you can join in discussion and share via the blog's Facebook Group


Monday, 22 December 2014

Simple Flat Braid Kumihimo Horsehair Bracelet

Find other pattern posts here

Eight Strand Flat Braid Bracelet Pattern


Some readers have asked about flat braid horsehair bracelets. These are easy to do using a square kumihimo plate. Unlike the basic spiral design though, you need to work through a series of moves then keep repeating the sequence until you have the length of braid you want.

It is my view that for horsehair, flat braid designs are probably less durable and so won't stand up to regular wear as well as the spiral design. But the end result is pretty and perfect for occasional use.

The bracelet here is my first attempt at a flat braid design. There are a couple of flaws where the tension was different or the sequence momentarily wrong. It turned out much, much neater than I expected, being just eight strands - or warps- with 10 hairs per strand.

The pattern is described below. I found it best to work through a sequence of moves right to the end then set your plate up to repeat the sequence. That way you will be able to take a break and when you return, you will know where you are up to.  

If you do make a mistake, work back in reverse to the start of a sequence, or to a point where you can see what the next move should be.

Setting up the kumihimo plate

Start Positions
For this pattern you will be using the two middle points at the top and bottom of the plate. Your plate may have a different arrangement of numbers or letters so check this before you start.

Here the top and bottom positions are 5,6 and 15, 16.

The horizontal ones will involve D,E,F and G on the left and d,e,f and g on the right.


Step 1
5 to e


Step 2
16 to F


Step 3
d to 16


Step 4
G to 5


Step 5
6 to E


Step 6
15 to f


Step 7
g to 6


Step 8
D to 15


 Resetting the horizontal strands

The strands at E and F move to D and G on the left

The strands at e and f move to d and g on the right


The horsehair bracelet was finished with sterling silver crimp ends and the horse attached using silver wire.

It was much quicker to braid than the spiral design and took about three hours in total to braid then finish off. A perfect gift for someone.