So many of you have contacted me to ask questions about making bracelets. It is lovely to hear from you and I am so pleased that you are trying things out for yourself.
I am about to post some short cuts and tips I have learnt over the past year which I hope will help those of you struggling to get the length right or to make the most use of the length of hair available to you.
Thinking it would be good to talk more and share projects, I have set up a group on Facebook. Just look for The Horsehair Bracelet Project group and you should find it. It is a closed group so posts are shared within the group only.
I look forward to meeting you there in addition to the more detailed posts here.
Friday, 23 August 2013

Saturday, 13 July 2013
Good News!
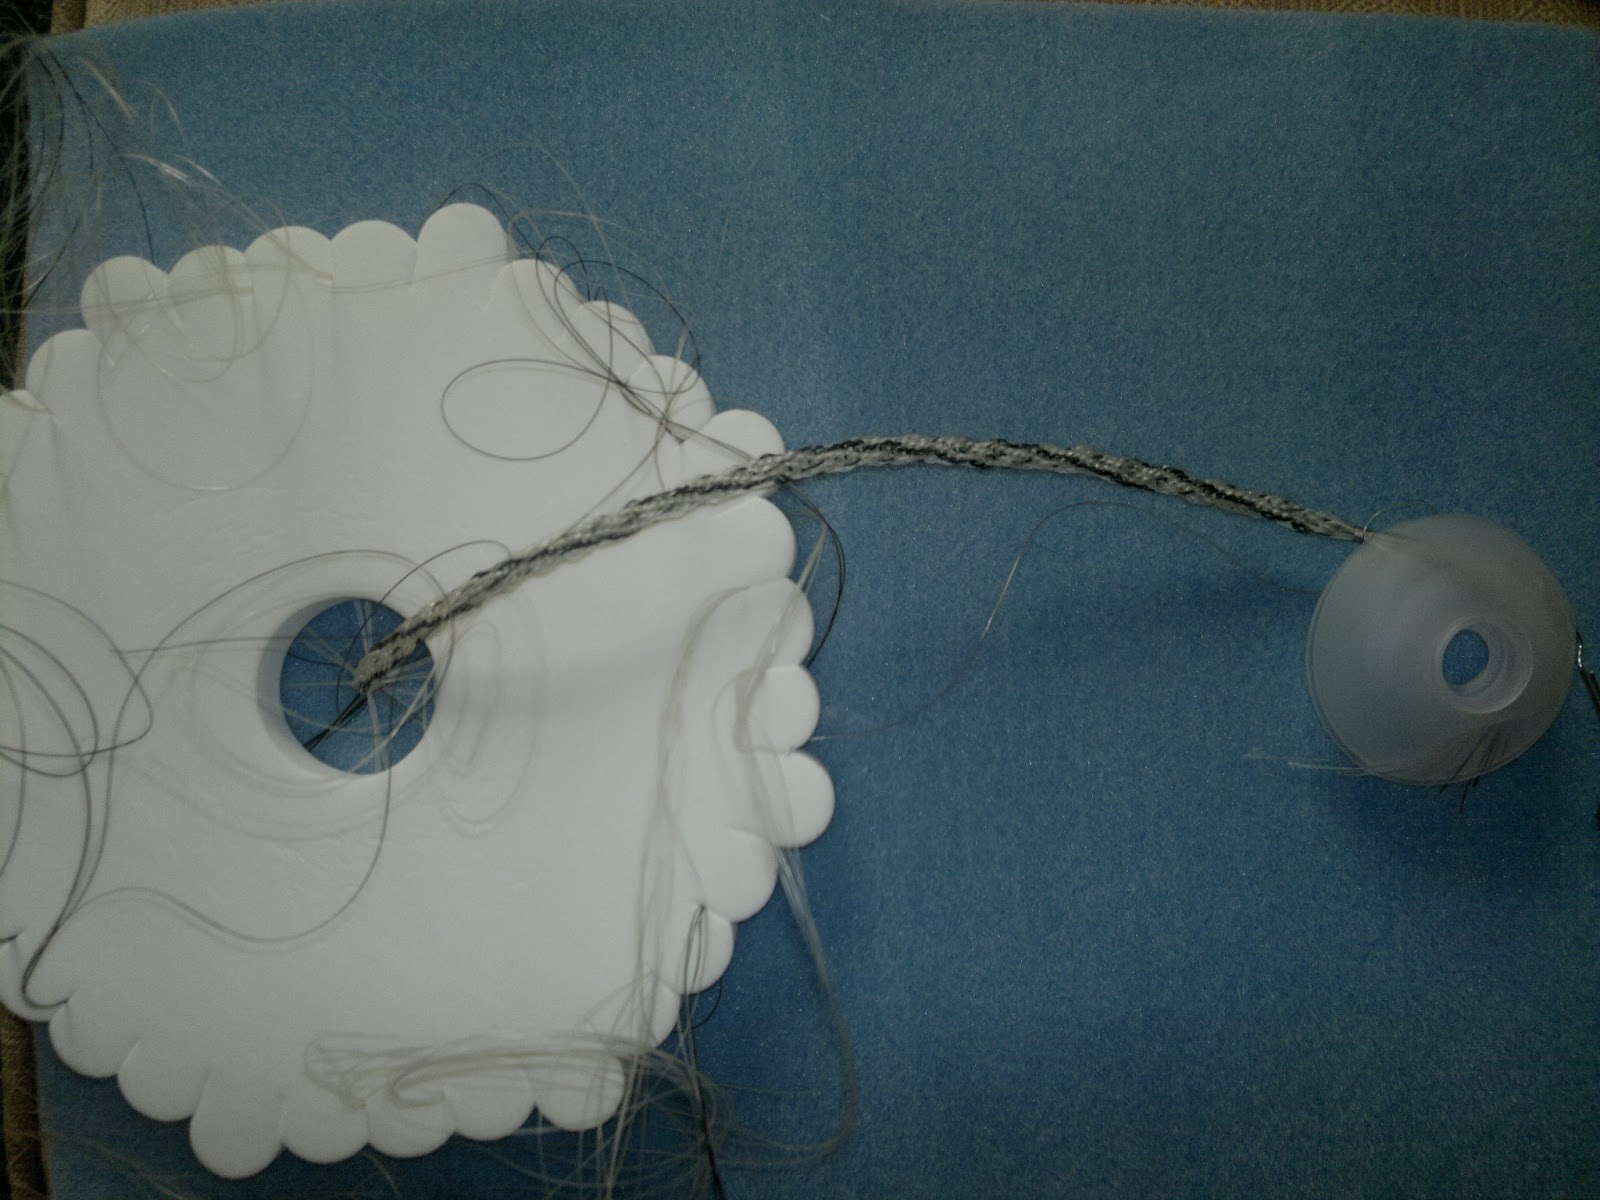
One of our friends is leaving the yard soon and I am working on making a special going away present for her. She is moving to Scotland and so we thought, why not make something from the tail hair of her two horses, but with a Celtic twist?
So the idea is that two braids will intertwine in a Celtic knot. Here is the first braid.
 The good news is that we went to see a horse and knew he was right for us. He came to us last month as an untrained four year old. He is well on his way to a happy future as an all round riding horse.
 Of course, it didn't go unnoticed that Charlie also had a pretty stunning tail. With a range of fabulous colours, you can bet those hairs will make a lovely necklace one day.
So the idea is that two braids will intertwine in a Celtic knot. Here is the first braid.
Both horses have very light hair. I hope to attach them in a Celtic heart design provided I can get the length I need. I will show you the finished knot soon.
It has been several weeks since I did any kumihimo. It has been good to get back into it again.
But that isn't the good news!
The good news is that we went to see a horse and knew he was right for us. He came to us last month as an untrained four year old. He is well on his way to a happy future as an all round riding horse.Of course, it didn't go unnoticed that Charlie also had a pretty stunning tail. With a range of fabulous colours, you can bet those hairs will make a lovely necklace one day.
If you want to see more of Charlie you can find him here, https://www.facebook.com/CharlieTheWonderHorse
Saturday, 29 June 2013
Kumihimo Spiral Necklace with Carnelian Beads
Find other pattern posts here

This is a necklace made using tightly braided horse tail hair (the longest lengths I could find) and carnelian semi-precious stones. As usual I used the kumihimo technique for the necklace and it turned out quite well.
I used a spiral 8 strand pattern with 3 tail hairs in each strand.
The hair was braided, then the stones were added then finished by braiding the other side of the necklace.
The tail hair is from our lovely Fell Pony who has now passed on.

Tuesday, 26 March 2013
What size bracelet to make
Find other pattern posts here
If you get this wrong, the end result may not fit into the end cap or clasp.
I am going to try to make it easy for you to get it right first time by telling you about the various sizes of bracelet in the photo below.

Deciding how what width you want your bracelet to be...
When I first started making horsehair bracelets last year, one of the biggest problems I had was working out just how many warps were needed for the kumihimo bracelet and how many horse hairs needed to go into each warp.If you get this wrong, the end result may not fit into the end cap or clasp.
I am going to try to make it easy for you to get it right first time by telling you about the various sizes of bracelet in the photo below.
So then, from left to right.
Bracelet 1: the thinnest bracelet (gold ends)
How long you make the bracelet is up to you, but I work on having the length of hair approximately three times the desired length of the final bracelet. Weaving the hair takes up a lot of length. The tighter the weave the more durable the bracelet.
This bracelet is a 16 strand kumihimo design. In each strand contains five hairs. This gives you a slim, dainty look.
Bracelet 2: the medium thickness bracelet (silver ends)
Here again is a 16 strand design. Each strand holds seven to ten hairs. The end cap for this bracelet is slightly bigger.
Bracelet 3: the thickest/widest bracelet (diamond pattern)
In this bracelet design there are 11-15 horse hairs per strand. That's a lot of hair to weave but the Styrofoam kumihimo disk holds the strands of hair together well while braiding.
Bracelet 4: the beaded bracelet
This bracelet is made from an 8 strand design with just three horse hairs per strand. Any thicker and it would be very difficult to thread and manage the beads, so the bracelets I have made have all followed an 8 strand (3 hairs in each) design.
How long does it take to make a bracelet?
People have asked me how long it takes to make a bracelet. From start to finish you can expect it to take up to seven hours on a spiral design. The more horse hairs you add, the longer it takes to make the bracelet simply because it takes more time to sort the hair and hold it at the correct tension while braiding. If you have a complex pattern or bead design that takes time too.
Making a bracelet can be very relaxing and enjoyable and you probably won't notice the time passing by. Before you know it, you will be looking at the finished bracelet!
Tuesday, 19 March 2013
Necklace project number four
Back to necklace making, using the longest strands of horse tail hair. Here is where I have struggled to come up with an effective way to attach several separate bits of work together, rather than rely on single lengths of hair. I have an idea but it seems I'd have to learn how to mould metals first.
Part of my idea was to have red and blue in the necklace. The necklace here is made from beads I bought at a recent fair. The seed beads are size 8 and the red and blue beads in the middle are 12mm.
As usual with necklaces, I have worked with 3x8 strands of hair. These had to be at least a metre long to accommodate the beads as they were woven on.

It has crossed my mind, why bother using horse hair at all given you can't really see it. But there is more to it than being able to see the horse hair. Just knowing it is there is special enough. You can see it at the very ends of the necklace in this example though.
As a beginner, it is a matter of trying lots of things and finding what looks good and what doesn't. Slowly discovering better, quicker ways to do some things. This is a leisure activity so I'm in no rush to learn too fast.
Monday, 18 March 2013
Suppliers of kumihimo findings
Finding the right supplier to meet your needs
With a bit of luck, now that you have seen what can be done with hair from a horse's tail, you will have started to want to have a go yourself.To start out all you need is a kumihimo disk. These are available internationally and are relatively easy to find. Mine came from the US, before I found a UK supplier. In America, kumihimo is quite popular. It really is a wonder why it is not as popular in Europe.
If you are in the UK, a good supplier is the Bead Shop in Manchester.
http://www.the-beadshop.co.uk/
For findings and beads Robin's beads is a place to find different sizes of end caps for your work.
http://www.robins-beads.co.uk/
I have used many different suppliers in just a few months but the two above are enough to get you started.
There are plenty of good videos on the internet to show you how to use a kumihimo disk. There is a great starter book called "Beautiful Braiding Made Easy: Using Kumihimo Disks and Plates" by Helen Deighan. It is a little childish in its presentation but there are a lot of tips and patterns to follow.
Wherever you are in the world, with the internet you can easily locate the items you need.
When I find a supplier I like I make sure I save the website details. Some findings are hard to find and you won't want to lose the details of the supplier of an item you really like.
If you have been interested in the bog so far and have any questions about any of my posts please feel free to ask. I still consider myself to be a learner but will hopefully be able to answer queries and ultimately encourage many of you to give bracelet making a go yourself.
Friday, 15 March 2013
Using Beads in the Horsehair Bracelet
In summer 2012, I first started to make bracelets from horse tail hair using the kumihimo technique. Once you master the basics, it can become a really satisfying thing to do.
If you are interested in trying to make something for yourself, you could watch a training video online such as the one from Beadaholique in the US
For me, kumihimo gives you the best results with horse hair.
The video gives you a really good idea of the basic technique on an 8 warp bracelet. When using horse tail hair I use 16 warps (group of hairs) for bracelets and 8 warp for necklaces and bracelets when beading.
Find other pattern posts here
Still using horse hair I used three hairs per warp. That is 8x3 = 24 hairs approximately 50cm in length. All the hair is sorted after washing and placed in position on the kumihimo disk. The beads (in this case size 6 seed beads) are threaded in the chosen order.
Very quickly, as you work around the disk, the bracelet emerges.
Here is one I finished today.

If you are interested in trying to make something for yourself, you could watch a training video online such as the one from Beadaholique in the US
For me, kumihimo gives you the best results with horse hair.
The video gives you a really good idea of the basic technique on an 8 warp bracelet. When using horse tail hair I use 16 warps (group of hairs) for bracelets and 8 warp for necklaces and bracelets when beading.
Find other pattern posts here
8 warp bracelet with slate coloured seed beads
Still using horse hair I used three hairs per warp. That is 8x3 = 24 hairs approximately 50cm in length. All the hair is sorted after washing and placed in position on the kumihimo disk. The beads (in this case size 6 seed beads) are threaded in the chosen order.
Very quickly, as you work around the disk, the bracelet emerges.
Here is one I finished today.
Subscribe to:
Posts (Atom)